Editing the Default Teams
Adhere to the following guidelines when editing the default team to avoid negative impacts on the Change Management workflow:
- Do not delete team members.
- Do not uncheck required tasks.
- Only additional approval tasks should be added to the team.
- From the SmartSolve Portal Page, click the Home tab.
- In the Setup and Policy section, click Setup.
- in the System Wide section, click Group.
Result: The Groups window is displayed. - Click the
 for the default team.
 - Click Role.
Result: The default team's Role tab is displayed. - Check the checkbox of the role to be edited, right click, and select Edit.
Result: The Role entry window is displayed.
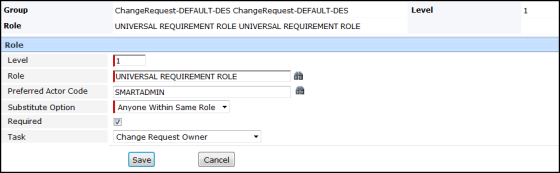
- Skip the Level field.
- Enter or zoom and select a role. Only actors with this role can be entered.
- Enter or zoom and select a preferred actor.
- Click the drop down button and select the substitute option. If you select None, then only this assigned actor can sign-off.
- Skip the Required field. Selecting or clearing this option at this time could create issues in the workflow later.
- Click the Save button.
Result: The new team member has been added to the list in the Group window.
See Also